


Photo by engin akyurt on Unsplash
Self Hosted Website on a Raspberry Pi (Part 3)
Domain Name Management with Cloudflare and Nginx Proxy Manager


This is a three part tutorial that cites relevant tutorial guides that I found online that help me eventually achieve my final goal of self-hosting my personal website.
- Part 1 - RPi Setup
- Part 2 - Flask App with Docker and Portainer
- Part 3 - Domain Name Management with Cloudflare and Nginx Proxy Manager (here)
It is ok to ssh to your RPi with your network’s public IP address, but it has two problems when you want to host your own websites and applications:
- It is hard to remember random numbers to share the link. Imagine how lame it is to share your website as 112.16.12.32
- It is not safe to expose your IP address since people can track you down with website such as check-host.net
That is why we will get a domain name and set up Cloudflare and Nginx Proxy Manager to direct traffic from domain into the applications in our RPi properly.
Basic Server Security
Since we are going to expose our server to the rest of the world, there are some basic firewalls to be placed. Even though our routers has port restrictions, it’s good to have software safeguards as well. Here we install ufw (Uncomplicated Firewall)
$ sudo apt install ufw
$ sudo ufw allow 22
$ sudo ufw allow 5000 # for our website docker port
$ sudo ufw enable
$ sudo ufw status
Status: active

To                         Action      From
--                         ------      ----
22                         ALLOW       Anywhere
5000                       ALLOW       Anywhere
22 (v6)                    ALLOW       Anywhere (v6)
5000 (v6)                  ALLOW       Anywhere (v6)
Get a Domain Name
Firstly, you need to get a domain name for your web server. If you want to keep cost as low as possible, you could get one with noip.com. For me, I simply can’t pass up my domain name so I got it off namecheap.com.
What is Cloudflare?

Cloudflare essentially is a massive worldwide network of servers in between users and a web server (interfaced by our router). First and foremost, they are a DNS (Domain Name System) provider, translating human readable domain names into numeric IP address meant for machine, which they can direct traffic to.
Providing this service means that they can also help to achieve two other things, security and speed.
Security: Because they are one of the largest network, they scan the most IP addresses worldwide and have visibility of IP address with bad intention to be blocked ASAP.
Speed: Since they have a really large network of servers, they can cache contents in your website so that users from the other side of the world will be served the content from the closest servers.
And the best part - all of these are free!
How to set up Cloudflare?
So how do we set up Cloudflare with our domain name? Rather than rewriting another guide, I found that the most comprehensive tutorial came from their community tutorial, from pointing nameservers to Cloudflare.
Step 1: Adding your domain to Cloudflare - Tutorial - Cloudflare Community
Step 2: Setting up SSL with Cloudflare - Tutorial - Cloudflare Community
Step 3: Enabling the 'Orange Cloud' - Tutorial - Cloudflare Community
After you connected your domain to Cloudflare, you can click on your domain > DNS to see all subdomain related to that domain. There might be alot of records or no records depending on your domain provider, and I usually remove all of them and create two of them:
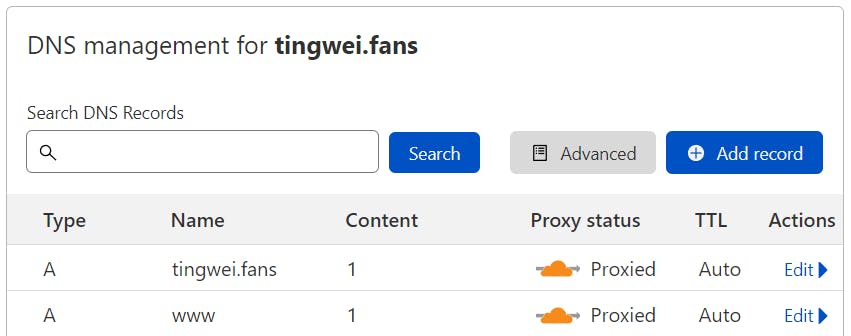
When you add records, put your public IP address we got from Part 1 in the tutorial under it. You could choose turn on the proxy status so that people cannot find your public IP address directly.
Some additional issues I had was
- Setting SSL policies to Flexible causing too many redirects - the solution is to change it to Strict
- Redirecting
www.tingwei.fanstotingwei.fansusing Rules functionality in Cloudflare - If you switch off your router, your public IP address might change. I am planning to implement this tutorial for the server to automatically detect changes to my public address and update it to Cloudflare.
What is Nginx Proxy Manager?

Nginx Proxy Manager is actually an UI for Nginx, an open sourced software for web server and reverse proxying. If Cloudflare helps mediate external traffic from the World Wide Web to your router, Nginx mediate internal traffic from your router to different applications in your server.
Why not just use the Nginx directly? If you need more complicated settings for your NGINX, you could consider doing it manually, but Nginx Proxy Manager provided me a cleaner interface for me to see what is going on, and helps with requesting SSL certificates for your domains.
How to set up Nginx Proxy Manager
The tutorials I followed was Nginx Proxy Manager - How-To Installation and Configuration - YouTube, and Full Setup Instructions | Nginx Proxy Manager. However they are not entirely just for Raspberry Pi and a Flask website, so I will elaborate further on my use case.
Before you start, you should go to Port Forwarding settings in your router that we mention in Part 1 to open up 81 or any open port.
Firstly, create a folder proxy-manager in any directory (I created under mnt), and create a docker-compose.yml file with the code below:
version: "3"                                                                                                                       docker-compose.yml                                                                                                                                  version: "3"
services:
  app:
    image: 'jc21/nginx-proxy-manager:latest'
    restart: unless-stopped
    ports:
      # These ports are in format <host-port>:<container-port>
      - '80:80' # Public HTTP Port
      - '443:443' # Public HTTPS Port
      - '81:81' # Admin Web Port can be other ports if you want
      # Add any other Stream port you want to expose
      # - '21:21' # FTP
    environment:
      DB_MYSQL_HOST: "db"
      DB_MYSQL_PORT: 3306
      DB_MYSQL_USER: "npm"
      DB_MYSQL_PASSWORD: "npm"
      DB_MYSQL_NAME: "npm"
      # Uncomment this if IPv6 is not enabled on your host
      # DISABLE_IPV6: 'true'
    volumes:
      - ./data:/data
      - ./letsencrypt:/etc/letsencrypt
    depends_on:
      - db

  db:
    image: 'jc21/mariadb-aria:latest'
    restart: unless-stopped
    environment:
      MYSQL_ROOT_PASSWORD: 'npm'
      MYSQL_DATABASE: 'npm'
      MYSQL_USER: 'npm'
      MYSQL_PASSWORD: 'npm'
    volumes:
      - ./data/mysql:/var/lib/mysql
Then you start up the docker image with
docker-compose up -d
You should then be able to access Nginx Proxy Manager from <private IP address>:81 The default login information is
Email:    admin@example.com
Password: changeme
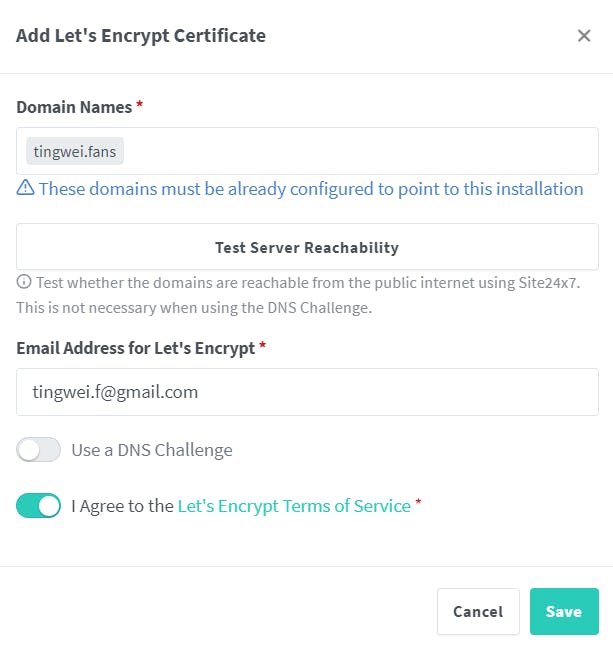
After that, we can go to SSL Certificates and Add SSL Certificate
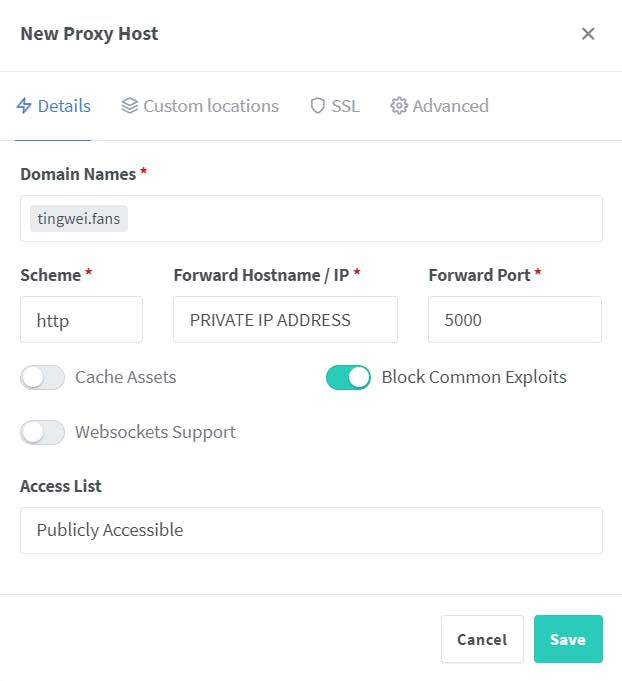
Then we go to Dashboard > Proxy Host and add a proxy host. Under Details, we put in the private IP address of our RPi, and forward the port to the flask app’s port, which is 5000 in our case. Toggle block common exploits for security sake.
Moving to SSL option:
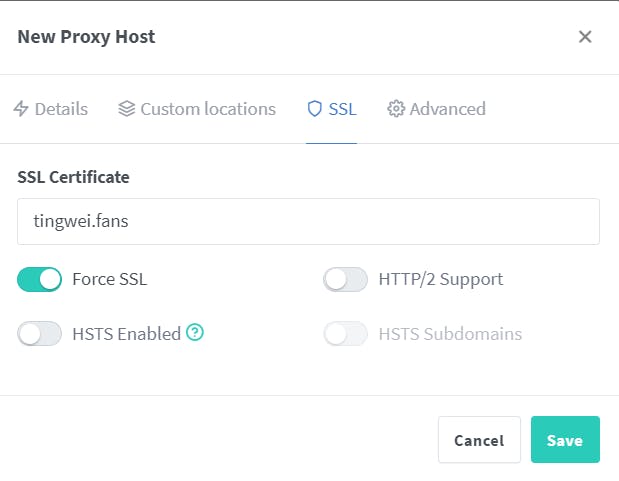
Select the SSL certificate that you have generated previously, and turn on force SSL. An SSL secured website looks less dubious and also perform better in SEO in Google.
And tadaa! You should have a working website that shows the contents of your Flask App.